Nagios XI Free,Guide for the Windows Sysadmin
Getting Started with Nagios XI Free is Extremely Easy!
Please Note: This guide is intended for testing and evaluation only.
At MCS, we strongly feel that Nagios XI is the best IT monitoring software available and has been for quite a long time. XI is the more polished, easy to use product over the community Nagios Core software. We have seen some resistance from enterprises that are mostly Microsoft Windows shops. There is no Windows version of Nagios XI available so sysadmins have to use Linux. For some, this may seem daunting. Getting started with Nagios XI Free is actually one of the simplest Linux tasks out there. Starting from nothing, you can start monitoring in only a few steps. This guide is for the Linux and Nagios newbie so we will cover everything.
Nagios XI used to only be supported on RHEL and CentOS but is now fully supported on Oracle Linux, Debian, and Ubuntu. Right now, we like CentOS 7 Minimal as it is stable, completely open source, and tried and true for running Nagios XI.
Starting Out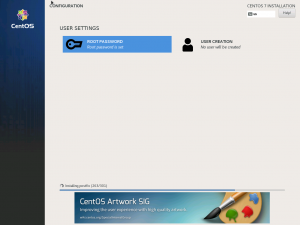
- Download CentOS 7 Minimal (no GUI needed)
- Install CentOS 7. Since I am talking about Microsoft shops in this article, I will use Hyper-V. Use a Gen1 VM any don’t use dynamic memory. If you are using VMware you can get the OS+Nagios XI ready to go in an OVA. We have even run Nagios XI stably on AWS on a t2.micro instance with a few dozen checks running.
- Nagios has been optimized very well over the years. You only need 1 CPU, 1GB RAM, and 8GB Storage. Of course, the more resources you assign the better!
- After install, login as root.
- Now this is the really slick part. As long as your new CentOS 7 Server has internet access, you only need to run a single command to download and fully install Nagios XI.
curl https://assets.nagios.com/downloads/nagiosxi/install.sh | sh
The amazing engineers from Nagios keep this install.sh script up to date for you. Using this command will always get you the latest stable release of Nagios XI fresh from the factory! Grab a cup of coffee and watch a beautiful waterfall of text scroll down your screen.
Take note of the URL to access Nagios XI:
Nagios XI Installation Complete!
You can access the Nagios XI web interface by visiting: http://<server_address>/nagiosxi
Once the install script is done, you now have a Nagios XI server of your very own. Just for best practices, you should now update your OS and software. Type:
yum update -y
Several items will update and you should reboot in case one of those updates was for the kernel.
rebootIn a browser, visit http://<server_address>/nagiosxi
If you missed the server address you can always run:
ip addr show
Now, set your nagiosadmin password and login via the web. By default, you will be using a 60 day trial of the Unlimited Enterprise Edition. If you plan to purchase Nagios, MCS can get you a key to extend your trial a little longer. If you want to use Nagios XI free, you don’t need any license at all. Just go to Admin > License Information and select free mode. This will let you monitor up to 7 different hosts with unlimited services.
Adding Hosts to Monitor
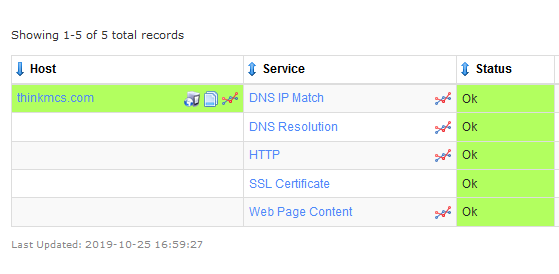
Nagios XI will monitor itself (localhost) by default. Adding common checks is easy though. Let’s say we want to keep an eye on our website.
- Go to Configure > Configuration Wizards
- Search for Website
- Enter your url
- Optionally customize your settings for your checks
In about one minute you are monitoring several critical metrics for a website. It is about as easy to monitor Windows Servers, Linux, networking gear, and just about anything with an IP address. It can actually be really fun and rewarding to finally get a real-time view into what is working and what is not.